

14 days free trial. $39/mo after trial. Cancel anytime. $40 ad coupon included


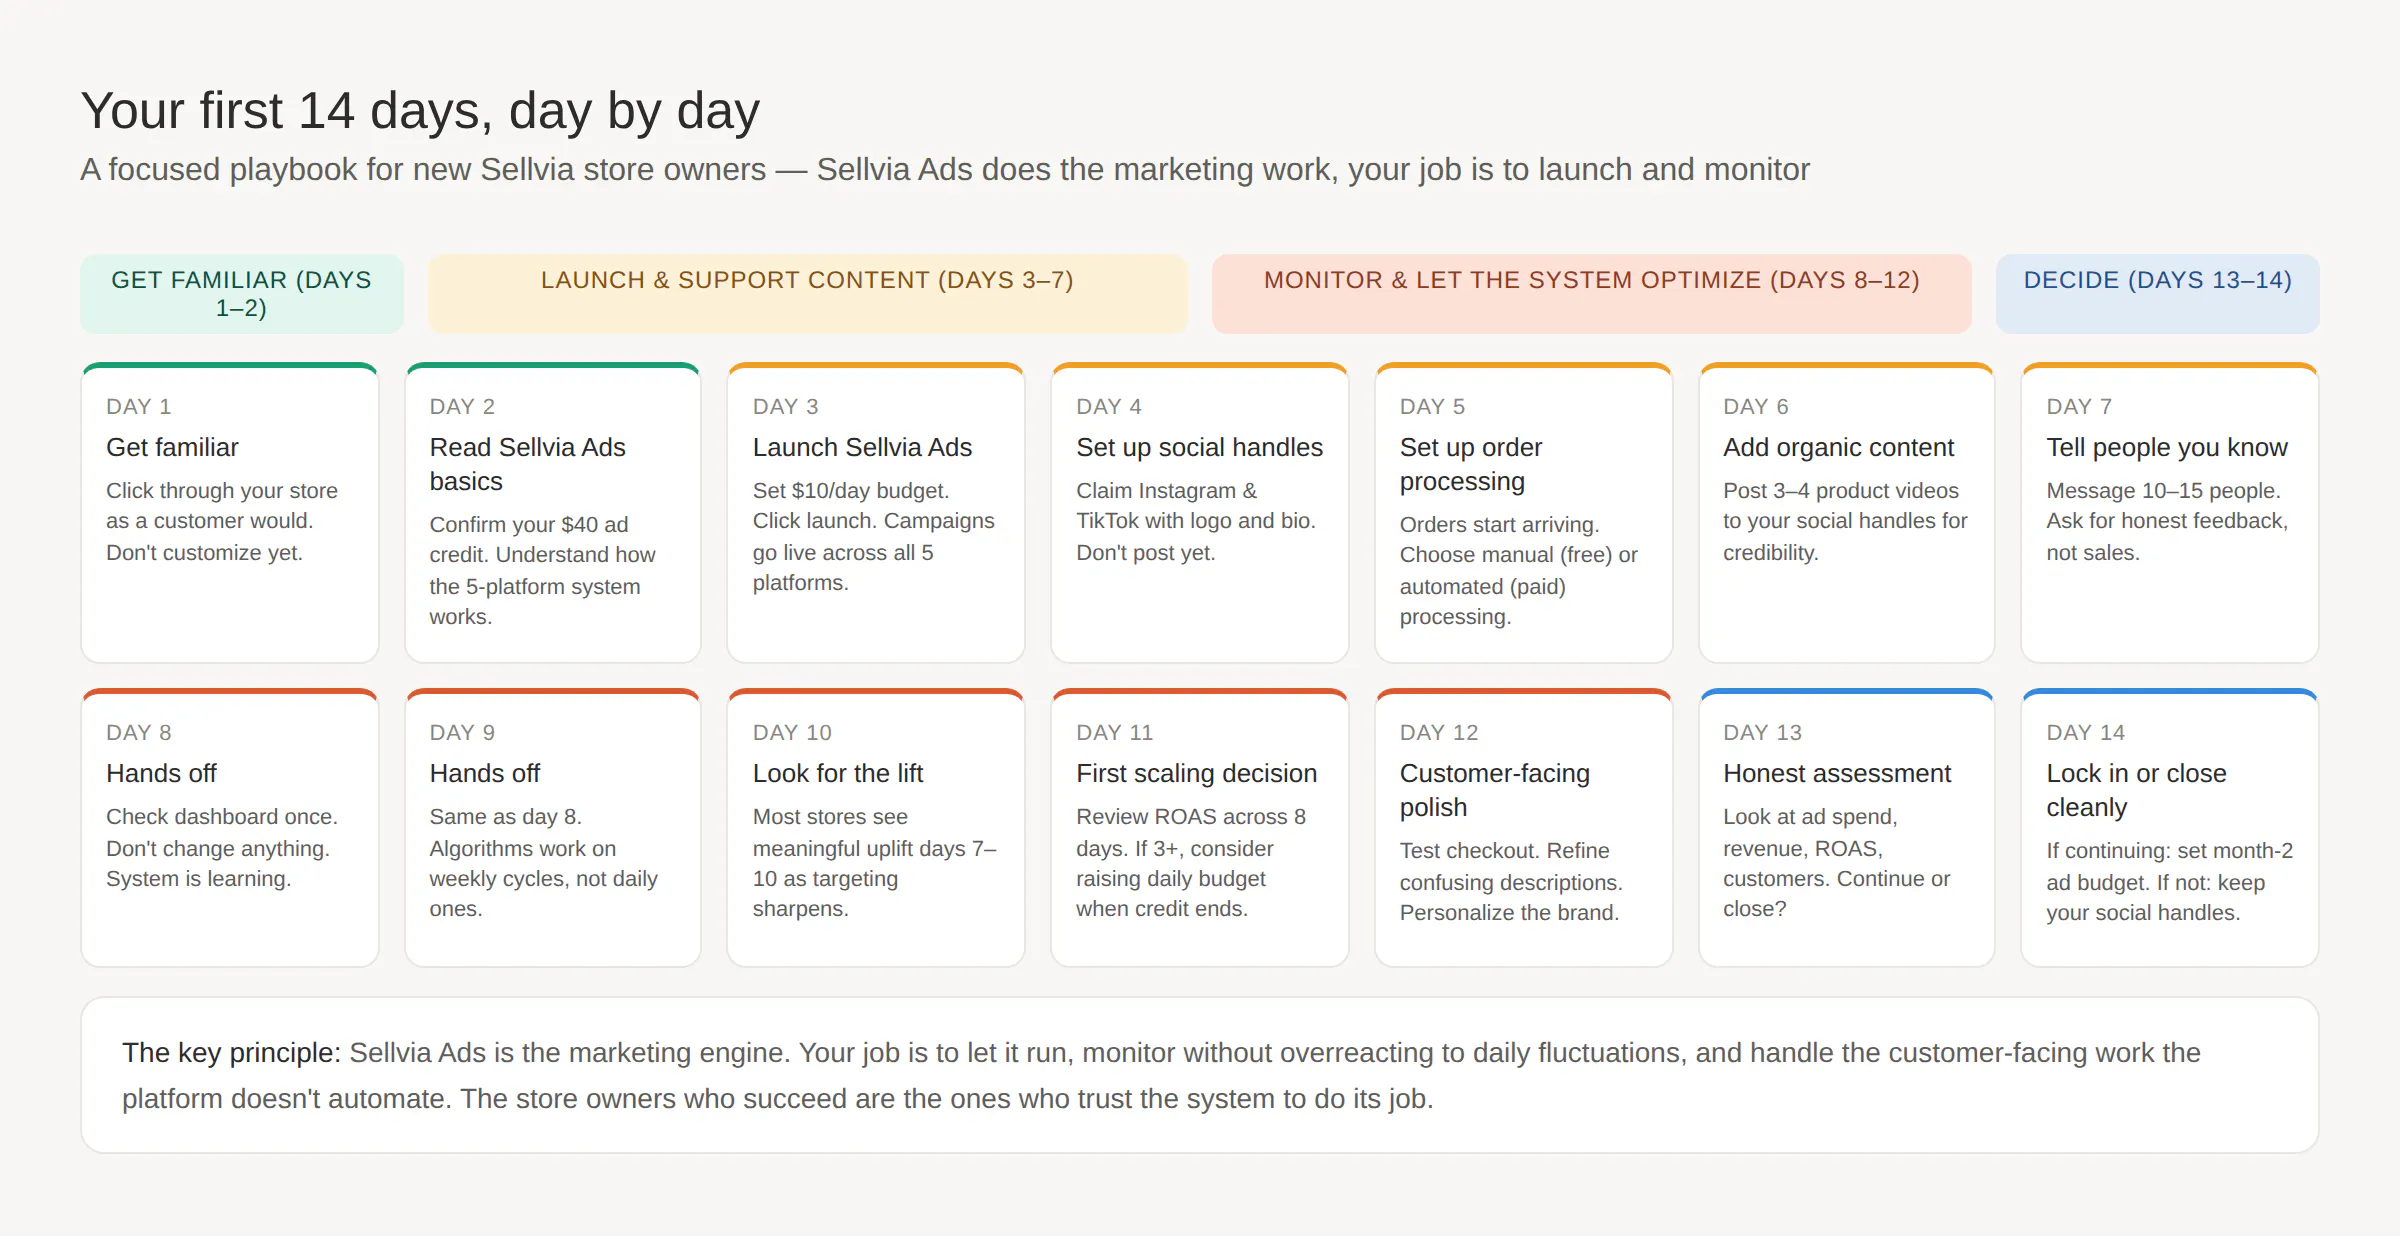
Your store is built. Your products are loaded. Sellvia Ads can launch automated campaigns across five platforms with one click. The 14-day free trial is enough time to launch your store, run your first ad campaigns using your $40 credit, and get your first sale — but only if you spend each day on the right thing. Here's the day-by-day playbook.
The 14-day free trial is the most important phase of your Sellvia journey, and most people waste at least half of it.
Not because they're lazy. Because they don't know what to do first. They sign up, see a working store with products already loaded, and then sit there wondering what's next. By day 7 they've watched a few tutorials. By day 12 they're panicking. By day 14 they've either committed without a sale to show for it, or they've cancelled without ever giving the store a real shot.
We've watched this pattern enough times to know exactly what should happen on each day instead. This is the playbook we'd give a friend who just started their trial.
A note before you start: Sellvia is built specifically so you don't have to do the things that usually take people weeks. You don't have to research a niche. You don't have to find products. You don't have to figure out which marketing channels work or how to write ads. Your store is already loaded with proven best-sellers that sell as-is, and Sellvia Ads runs automated campaigns on Google, Instagram, Amazon, TikTok, and Facebook simultaneously with one click. Most of the "first 14 days" advice you'll read elsewhere assumes you have to build all of that yourself. You don't. Your job is different — and shorter.
The biggest mistake new store owners make on day one is opening the dashboard and immediately trying to redesign everything. Don't do this. Your store was built to convert. The products were chosen because they sell. Customizing before you understand how it all works just slows you down.
What to do instead: log in, look at every page on your store from a customer's perspective. Click around like you're shopping. Read three product descriptions. Check the homepage, the checkout flow, and the email confirmation. Spend 10 minutes in the Sellvia Ads section just to see what's there — you don't need to launch anything yet, just get familiar with the interface.
That's it. Your day 1 job is to understand what you have, not to make it different.
Your account comes with a $40 ad credit specifically intended for your first Sellvia Ads campaigns. At the minimum daily budget of $10/
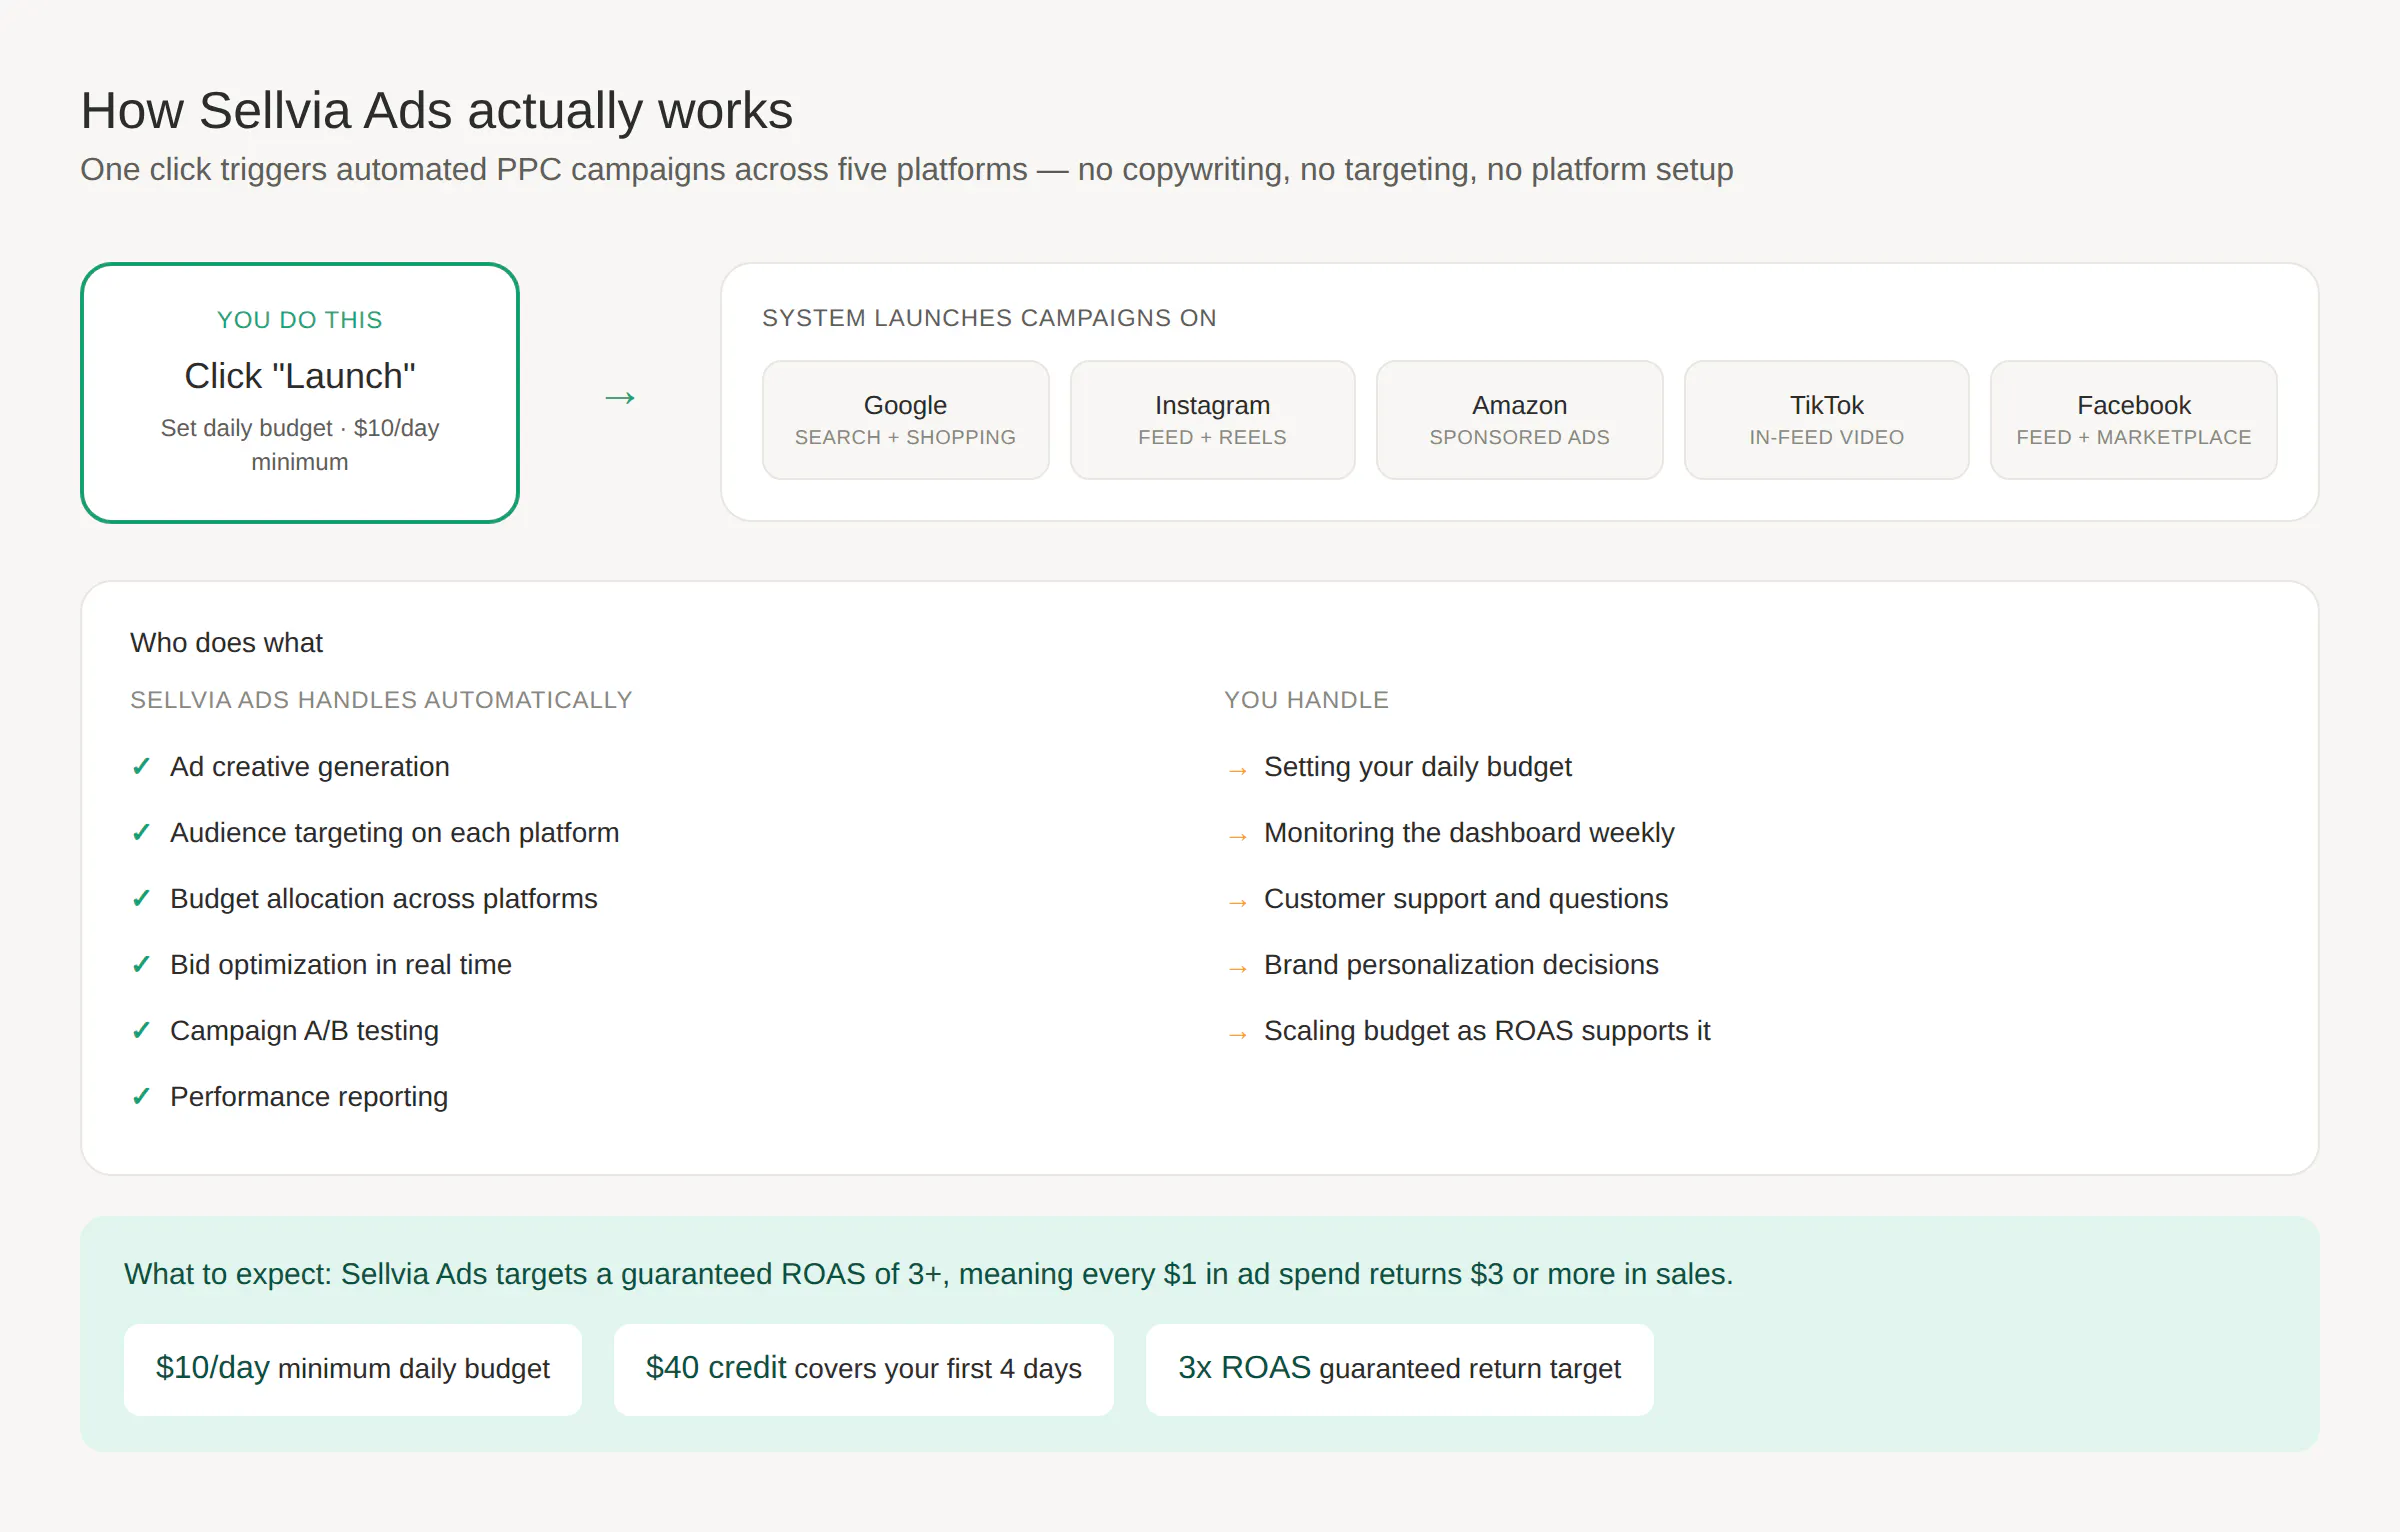
day, that's roughly four days of automated campaigns running across all five platforms — exactly the amount you need to see real signal from real customers.
On day 2, do two things. First, confirm the $40 credit is showing on your account. Second, read the Sellvia Ads overview in the Academy. You don't have to memorize anything — you just need to understand the basics: what platforms it runs on, what "guaranteed ROAS 3+" means for your campaigns, and where you'll see results in your dashboard.
We're spending a full day on this because most store owners launch ads they don't understand and then panic at the first metric they don't recognize. An hour of reading on day 2 prevents most of that.
This is the day your store actually starts making money — or at least starts having a real chance to.
Open the Sellvia Ads section in your dashboard. Set your daily budget to $10 (the minimum, and what your $40 credit covers). Click launch. That's it. Sellvia Ads will automatically create, place, and optimize campaigns across Google, Instagram, Amazon, TikTok, and Facebook for you. You don't write copy. You don't pick targeting. You don't choose which platforms to run on. The system handles all of it.
What happens next: campaigns go live within hours. The first day's performance data starts populating your dashboard by day 4. You'll see impressions, clicks, and any sales rolling in.
A note on expectations: day one of any ad campaign is not representative. Platforms need 48–72 hours to learn who your real customers are. Don't make decisions based on day-one data.
While Sellvia Ads runs in the background, you have a different job: making sure customers who land on your store have other ways to find and trust you.
Set up an Instagram account and a TikTok account, both branded to match your store. Don't post anything yet. Don't worry about followers. Just claim the handles, upload a profile picture (use your store logo), write a one-line bio with your store URL. Total time: about 30 minutes.
Why this matters even though Sellvia Ads is doing the heavy lifting: customers check social profiles before they buy. An empty social profile is fine. A non-existent one creates doubt. Sellvia Ads will drive traffic to your store, but customers who hesitate will look you up. The placeholder needs to exist.
This is the day most "first 14 days" guides skip — and it's also the day that matters most for keeping your business running.
Sellvia Ads launched on day 3. By day 5, your campaigns have been live for 48 hours, the platforms have started learning, and orders are about to start arriving in your dashboard. Real customers paying real money for real products. The next operational question is: how are those orders going to get processed?
You have two options, and you need to choose one before orders pile up.
Option 1: Process orders manually. When an order comes in, you go into your dashboard, confirm the order details, and click through the fulfillment flow yourself. This is free — it's included in your $39/month subscription. The trade-off is your time. Manual processing takes a few minutes per order, which is fine when you're getting two or three orders a day, but becomes the bottleneck of your business if your store starts performing well.
Option 2: Turn on automated order processing. For a reasonable additional fee, Sellvia processes every order automatically the moment it comes in. You don't have to log in. You don't have to click anything. Orders move from "received" to "fulfilled" without you touching them. This is what most stores switch to once they're getting more than a handful of orders per day.
Our recommendation for the first 14 days: start with manual processing. Not because it's better, but because doing it manually a few times teaches you exactly how the order flow works — what customers see, what information moves where, what the timing looks like. That understanding is genuinely useful even after you switch to automated processing later. You can flip the switch any time.
What you should not do: ignore order processing entirely and assume it'll handle itself. It won't. An unprocessed order means a customer waiting on a confirmation they never get, which means a refund request, which means a chargeback risk, which is the worst possible outcome of your first 14 days. The whole point of getting orders is keeping the customers who placed them.
Spend 30 minutes on day 5 doing two things: read the order processing guide in the Academy, and do a test run if you have an order to practice on. If you don't have orders yet by day 5, that's fine — most stores see their first orders between days 5 and 8. Be ready before they arrive.
A separate note on campaign data: you might be tempted to spend day 5 staring at the Sellvia Ads dashboard, watching impressions and clicks. Don't. Sellvia Ads uses AI-based optimization that runs continuously in the background — the system is reading the data and adjusting in real time without you. Watching the dashboard hourly won't make campaigns perform better. We'll have a real campaign data review on day 11 once enough learning has happened to make the numbers meaningful.
Now that your accounts exist, post some content. Not ads. Not sales pitches. Three or four posts that show what your products do.
The format that works best is short video or image content showing a product solving a problem. You can shoot all of it on your phone in under an hour. Post a couple to Instagram, a couple to TikTok.
This isn't your primary marketing — Sellvia Ads is. This is supporting content for customers who land on your store and want to verify you're a real, credible business before buying.
Send a message to 10–15 people in your life letting them know you've launched a store. Not a sales pitch. Just: "Hey, I launched this online store this week — would love your honest feedback."
Some will buy out of support. More importantly, the people who don't buy will tell you why, which is information you can't get any other way. This is also the easiest set of organic traffic you'll ever have.
This is the hardest part of the playbook for most people: doing nothing.
Sellvia Ads is optimizing in the background. Your job is to check the dashboard once a day, see how things are trending, and resist the urge to change anything. The system needs runway to find your customers and improve performance. Most stores see meaningful uplift in days 7–10 of campaigns as the algorithms zero in.
Things you might be tempted to do that you should not do: pause campaigns because day 8 was slower than day 7, increase your budget because day 9 was great, or cancel ads because you "haven't made enough yet." All of these are common mistakes. The system works on weekly cycles, not daily ones.
If you absolutely must do something during this window, do organic things — post one more piece of content, comment on accounts in your space, follow up with the people you messaged on day 7. Leave the ad campaigns alone.
By day 11, you have 8 days of campaign data. This is enough to make your first informed decision.
Open the Sellvia Ads dashboard and look at total ad spend, total revenue, and ROAS. Three scenarios.
Scenario 1: ROAS is 3+ and revenue is meaningful. Sellvia Ads is working as designed. Consider increasing your daily budget when your $40 credit runs out — even moving from $10/day to $15/day at sustained 3x ROAS makes a real difference.
Scenario 2: ROAS is positive but below 3. Normal in early days. The system is still optimizing. Don't change anything yet.
Scenario 3: Limited or no sales yet. Less common but it happens. Check support resources or contact our team — there may be something specific about your setup worth reviewing.
In all three scenarios, you continue running. The point of day 11 is to look at real numbers, not to make hasty changes.
Whether you've had sales or not, day 12 is the right time to make sure the rest of your store is in shape.
Read every product description on your store as a customer. Are there any that confuse you, even slightly? Note them — these are the only things worth changing. Test the checkout flow. Make sure your contact information is clear in case a customer has a question. If you've already had orders, check that fulfillment ran smoothly.
This is also a good day to think about branding choices that make your store feel personal — the store name, the homepage banner, anything that signals this is run by a real person rather than another anonymous storefront. Customers convert better when stores feel human.
By day 13, you need to make an honest decision about whether to continue.
The questions worth answering:
Did Sellvia Ads run for a full 8+ days? If you launched late or paused campaigns, the trial wasn't a real test. Restart with a real effort before you decide.
What does the data show? Total ad spend, total revenue, ROAS, and number of customers. These four numbers tell you almost everything.
What changes if you continue? The $39/month subscription kicks in on day 14. The question isn't "did I make $39 in profit yet" — it's "do I now believe this is working, and that I can build on it given another 30 days at a slightly higher ad budget?"
If yes, continue. If no, cancel. Both are legitimate decisions. The mistake is making them without thinking through the data.
If you're continuing: write down your month-2 ad budget. If your $40 credit ran for 4 days at $10/day and your campaigns showed signs of working, your most likely next step is $10–$15/day for the rest of the month. Sellvia Ads will continue optimizing — most stores see better performance in month 2 than month 1 because the platforms have more learning data.
If you're cancelling: do it cleanly. The store can be reactivated later if your situation changes. Keep your social handles. And consider the Sellvia Market option if you've built something with real signs of life — selling your store to someone else can recover your time investment.
The 14-day playbook isn't really about 14 days. It's about establishing the rhythm of running a Sellvia store: let the system do its job, check the data without overreacting to it, scale your budget gradually as the numbers support it, and handle the human-facing parts of the business that the platform doesn't automate.
Store owners who succeed in their first year aren't the ones who got lucky in week 1. They're the ones who let Sellvia Ads run, adjusted their daily budget thoughtfully, and showed up for the customer-facing work week after week.
If you want more detailed guidance on any specific phase, the Beginners' Dropshipping Course and Basic Marketing Course in the Academy walk through each step in depth. We'll be publishing more articles in the coming weeks covering Sellvia Ads in detail — how the cross-platform campaigns work, how to read the dashboard, and how to scale your budget as your store grows.
The first 14 days set everything up. Spend them on the right things.

